Showing posts with label dessert. Show all posts

Thursday, 21 November 2013

Thanksgiving Turkey Smores' Pops


This one is just in time for the Holidays!  Yeah, I know it's been like a year since I last posted, but hey - take what you can get!  These little smores' pops will be perfect for pre or post Thanksgiving parties where there will be lots of kids.  I know tons of kids who don't like pumpkin or pecan pie, plus who wants to waste the good stuff on the kids anyway?

Thanksgiving Turkey Smores' Pops
Makes 20ish


Ingredients:

  • 1 box honey Graham Crackers
  • 5 Extra-Jumbo-Huge Campfire Marshmallows
  • 5 regular/large marshmallows
  • 1 bag candy corn
  • 1 C real chocolate chips
  • 1 bag thin pretzel sticks
  • Bowl of powdered sugar


Other Supplies:

  • Set of 3 circle cutters - 2", 1", 1/2"(perfect size set available in the cake baking section of Michaels or Hobby Lobby for cutting fondant - they make great regular cookie/small biscuit cutters!)
  • Candy melting/icing bag OR quart ziplock
  • 20 4" cake pop sticks (optional)
  • Cake pop display (optional)


So, just to be clear - this is not a FAST craft/treat.  It is, however, an easy one, and you won't need any special skills or knowledge to put these cute little guys together.  They are fine at room temperature, and the only possible problem will be the crackers going stale.  Wrap the plate or pop stand lightly with several overlapping layers of plastic wrap to keep out the air and they should be fine for a day or 2.

Step One - Melt the Chocolate


This needs to happen first because the chocolate will actually be too warm and thin at first, and we want it to thicken up before we need it.  Pour about 1/2C of real semi-sweet chocolate chips into the corner of a quart baggie or candy/icing bag.  Fake chocolate-flavored chips won't melt or set up properly.  Even cheap real chocolate will work fine here.  Set it into a bowl or coffee cup so it won't start dripping out the top, and microwave for 30 seconds.  Remove and try to squish the chocolate.  It won't be ready yet, so nuke it again for just 15 seconds.  Squish and nuke again for only 10 seconds.  Do this a couple more times until about 2/3 of the chocolate is melted, and it is just barely warm.  DO NOT LET THE CHOCOLATE GET HOT!!  Once you feel a warm patch, hold the top closed and just knead and squish until the rest melts with it's own warmth.  Set this aside - it will be plenty soft for the next 20-30 minutes.  Melt more when needed.

Step 2 - Cut out the Graham Crackers


The first graham crackers we need are for the Turkey's Body Base.  Stack the crackers 2 high and cut right through them with the 2" cutter.  I was amazed that they didn't crack or crumble!  The edges aren't perfect, but that's ok.  For 20 pops, you'll need 40 2" circles total, so get cuttin'!  This cracker cutting process is extremely messy and wasteful.  Scoop all your edges and scraps into another baggie to save for a graham cracker pie crust for Thanksgiving!  While you're in cutting mode, you might as well cut the rest of your circles and be done with the mess.  Cut 20 1" circles and 20 1/2" circles as well.  You will probably have enough large edge pieces for all your smallest circles.  Use a pretzel stick to pop the smallest circles out of the cutter when they're stuck.  Maybe make a few extras for breakage.

Step 3 - Make The Turkey's Tail

I hadn't added the legs yet here

Lay out 20 of your 2" circles on a cookie sheet, large cutting board, cooling rack, or whatever else you want to leave them on to dry.  You'll want a couple of inches between them so they are easy to work with.  Snip a very tiny corner off your chocolate bag.  If you are using a baggie, you'll want to watch for tearing - the hole may stretch out and get to big, and you'll need to squirt it all into a fresh bag.  If you're using a candy/icing bag this won't happen.  Make a thick-ish half circle of chocolate across the top of your cracker, and an upside-down 'V' at the bottom.  Go ahead and do all of them now so the chocolate can continue to set up.  If your chocolate was already too cool, nuke it again but only for 5 seconds.  Once it's been melted it re-liquifies very quickly.  Just be sure to pinch the tip closed when you knead it ;-)

Press 5 candy corns into your semicircle, points down, for the tail.  Now, take one thin pretzel stick, break it in half, and make 2 legs sticking out at the bottom.  You can do one turkey at a time, or do all the tails then all the legs - it doesn't matter.  Chocolate cools slowly. (But only when you're waiting for it to cool.  If you need it to stay warm and and soft, it cools too fast... go figure.)

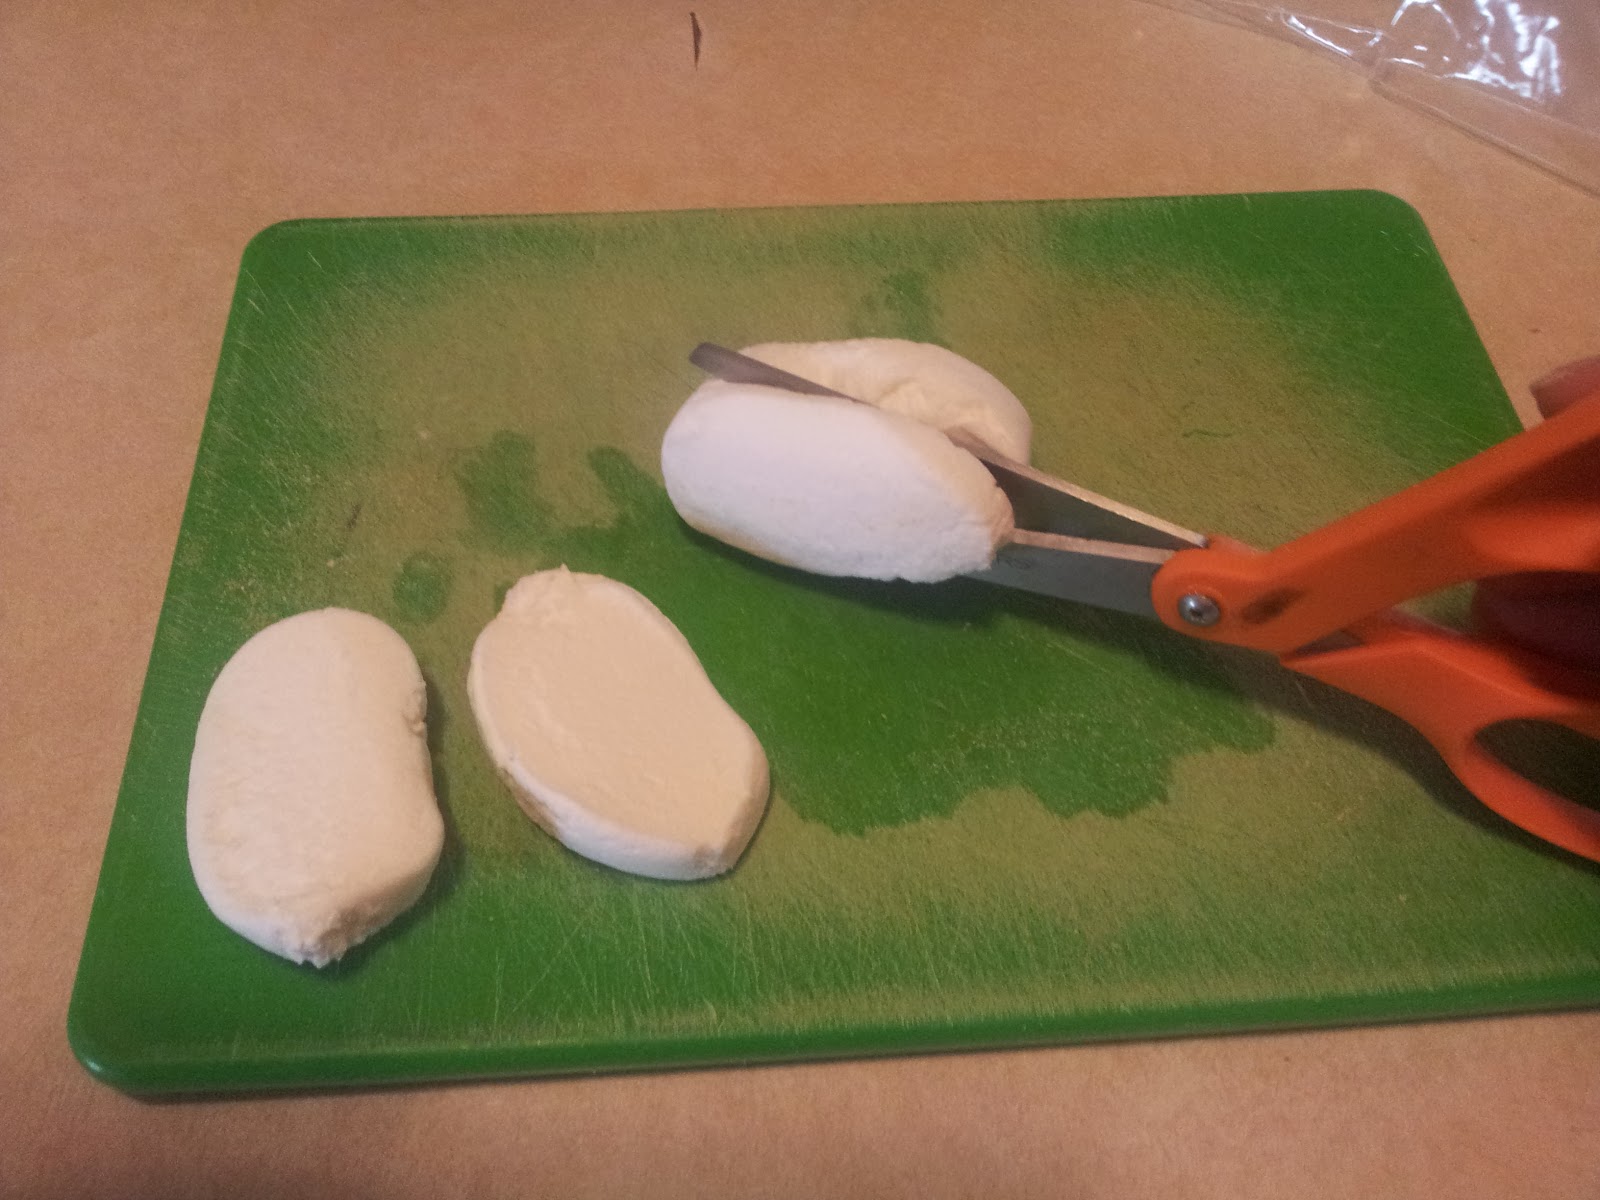
Step 4 - Cut the Marshmallows


Now comes the sticky part.  Wash a pair of scissors with dish soap, then use them to cut your jumbo and regular marshmallows into 4 slices each.  Cut each 'mallow in half, then each piece in half again - you want to end up with jumbo discs about 1/2" thick, and regular discs around 1/4" thick.  After each slice is completed, drop it into the powdered sugar.  When they are all done, flip and pat the pieces so the sticky sides get coated with sugar - now they won't stick to your hands!  Pat them well to remove excess then you can toss them all into a pile or onto a plate and put away the powdered sugar and clean up the large cloud of white powder you just created.  Your scissors will appreciate a trip through the dishwasher.

Now, go back to your tails.  Make another semicircle of chocolate on top of the tips of the candy corn, and another upside-down "V" over the legs.  Since these are the highest points, this is the only place the marshmallow will touch.  Now gently press a jumbo 'mallow disk onto each tail, roughly lining it up with the cracker.  Since it isn't sticky, you can re-round it a bit first from where the scissors flattened it.  Hopefully, your tail has cooled enough by now that the candy corn doesn't move out of place, but keep an eye on them anyway.

Step 5 - Add the Pop Stick and Front of Body

Originally, I tried to stick the legs into the sides of the mallow.  No Fun.  Gluing them into chocolate worked much better.

This next part is quick and easy, but do just one turkey at a time for this round.  Make a thick-ish line of chocolate, about 1" long, right between the legs.  Press a cake pop stick onto the chocolate, make another thick line of chocolate on top of the stick and a swirl on the 'mallow, then press the other 2" graham cracker on top.  The weight of the cracker will hold the stick down in the chocolate. (at some point during all of this you'll need to melt more chocolate.  You can use the same bag, just pinch the hole closed while kneading) Repeat for all Turkeys.  Of course, you can skip the stick altogether and just serve these on a plate.

Step 6 - The Rest of the Turkey

My first 4 Turkeys didn't get sticks.  I forgot.

Whew!  You're over halfway done!  Now the rest is just squirt and stack!  Make a blob of chocolate near the bottom and place a regular 'mallow disc, then more chocolate and the 1" cracker.  Make a thin line of chocolate from the bottom of the cracker to the middle, then press on a single candy corn, with the point up.  You may want to do them all up to this point to let the chocolate set up holding the candy corn.  The last step is to make a small blob of chocolate at the top of the candy corn to stick on the 1/2" cracker.  Now add eyes and a beak and you are done!!

You'll want to give these guys at least 2 hours to dry.  You can check them by picking one up and flexing it gently around the stick - to see if the stick tries to peel out of the chocolate or not.  If the chocolate is solid and only the 'mallow stretches, then they are cool enough to place in your pop stand!  You'll need to space them out, since they are so much bigger than regular cake pops.  Tail-to-tail works well.

These are a lot of work, but not hard.  They are pretty crummy to eat, but no more than regular smores - and at least the chocolate and marshmallows aren't squishy! Impress all your friends this Thanksgiving Day with these cute Thankgiving Turkey Smores' Pops!


Monday, 14 November 2011

Sinfully Rich Brownies

So, I've had million of great comments about my buttercream frosted brownies, so I thought it was high time to post the recipe!  Here ya go!


Sinfully Rich Brownies
2 sticks butter, melted & slightly cooled
1 3/4C sugar
2 teaspoons vanilla
3 large eggs
1C flour
1C cocoa powder
1C chopped walnuts (optional - i did not use)

Heat oven to 350.  Grease an 8x8 or 9x9 pan (crisco works best)

Beat sugar, vanilla and eggs on med/high speed for 5 minutes - a stand mixer helps here.  They should be pale and very fluffy.  With the mixer running, drizzle in the butter.  Turn mixer to low, and add cocoa (carefully so you don't get a face-full!)  Then, add flour and mix just until moistened.  Use a spoon to stir in nuts, then pour into pan.

Bake for 40-45 minutes or until edges pull away from sides of pan (center can be a tad gooey).  Be careful not to overbake.  Cool completely before cutting. (not even kidding, don't cut them warm!)

Wedding Cake Buttercream

1 stick butter, softened
1/2 teaspoon almond extract
1/4 teaspoon vanilla
1 tablespoon milk
3-5 C powdered sugar
mini chocolate chips, optional

Mix together all ingredients except sugar.  Add sugar 1C at a time until your desired consistency/taste.  Spread over totally cooled brownies - you should only need about 1/2 the frosting.  Sprinkle top with mini chocolate chips, if desired.

For better presentation, i always cut my brownies before icing them.  Then they pop out perfectly, but the top still looks great when it's time to serve.

Hope you all love them!!

Thursday, 3 November 2011

Cheesecake, cheesecake, glorious cheesecake!!

Super quick post - sorry I have not posted in ages!  I had these cheesecakes the other night, and had to get the recipes!!  I have never made a wonderful cheesecake, but these 2 recipes will now be my standard.  They were both wonderful, but the plain vanilla one was my favorite - hands down!  Enjoy!


Philadelphia Vanilla Mousse Cheesecake

40 Nilla wafers, crushed (about 1.5C)
3T melted butter
 4 pkg. (oz each) cream cheese, divided
1C sugar, divided
1T + 1t vanilla, divided
3 eggs
1 8oz. tub cool whip, thawed
fresh raspberries

Heat oven to 325.  Mix wafer crumbs and melted butter.  press onto the bottom only of a 9" springform pan.

Beat 3 pkgs. cream cheese, 3/4C sugar and 1T vanilla until well blended.  Add 1 egg at a time, blending after each one, until just blended.  Pour over crust

Bake for 50-55 minutes or until center is almost set.  Run a thin knife around rim to loosen cake.  Col completely in pan.

Beat remaining block of cream cheese, 1/4C sugar, and 1t vanilla.  Whisk in cool whip.  Spread over cooled cheesecake.  Chill 4 hours or until firm.  Decorate top with fresh raspberries.  (the raspberries really made the cake amazing - don't leave them out!!)

Serves 16


Spiced Pumpkin Cheesecake

38 Nabisco Ginger Snaps, crushed
1/4C pecans, finely chopped
1/4C butter, melted
4 (8oz) pkgs. cream cheese
1C sugar
1 can pumpkin (not pie mix)
1T pumpkin pie spice
1t vanilla
4 eggs
cool whip/whipped cream and nutmeg to serve


Heat oven to 325.  Mix crumbs, pecans and butter.  Press on bottom and 1" up the sides of a 9" springform pan.

Beat cream cheese and sugar.  Add pumpkin, spice and vanilla.  Add eggs 1 at a time, beating after each addition until just blended.  Pout over crust.

Bake for 1:20 to 1:30 minutes or until center is almost set.  Run a thin knife around rim to loosen cake.  Cool in pan, then refrigerate 4 hours or until cold and set.  Serve each slice with a dollop of whipped cream and a dusting of nutmeg.

Serves 16

Friday, 11 February 2011

Valentine's Day 2011


Valentine's Dinner 2011
featuring Mastering the Art of French Cooking
by Julia Child.


Friday, Feb 11:


Started working on some stuff today to prepare for tomorrow. Made my Praline for dessert - burned the first batch of caramel, but the second turned out alright. Pretty much looks like peanut brittle. Pulsed in the processor for about 30 seconds, and it's done!

Trimmed 2 of my 4 lamb shanks. I didn't know what I was doing, and I was afraid of taking off too much of the fat and not having any flavor left. The other 2 I'm not even going to touch - we'll see which ones turn out better.

I think that's all for today. It's actually not that much work, and it can all be done tomorrow, then held until re-heated for dinner!! Yay!

Saturday, February 12:

The day is here! This morning, Matt took Abby out to the park for several hours, so I started work as soon as Anya went down for her morning nap. First I took care of my lamb. This dish is easy to prepare ahead of time and them bring back to a simmer before dinner. I browned the lamb, then made my sauce and put it all into the oven for about an hour. In hindsight, it was a little tough, and should have braised for about another 30-60 minutes. I refrigerated my stock so I could easily scoop the fat off, then reduced my sauce down to a nice thick glaze. All done and ready for dinner!

Next I worked on my potatoes. I peeled a bag of fingerling red & yellow potatoes, then sautéed them slowly until tender. I drained them on paper towels and saved the buttered skillet until dinner.

Carrots were easy. I quartered fat baby carrots then simmered them for 30 minutes with a touch of sugar, butter, salt & pepper.

I blanched my brussels sprouts, then placed them in a small casserole drizzled with butter, salt & pepper.

30 minutes before dinner, I brought my lamb sauce to a simmer, added the shanks back in then popped it into the oven to re-heat, with the brussels sprouts beside them. I heated my potato skillet, browned my potatoes further and added fresh chives, rosemary & parsley. I also sautéed my carrots briefly with chives and parsley.

When it was all done, I plated our beautiful dinner and poured the remaining gravy into a small pitcher. The flavors were excellant. Well developed and rich, well seasoned and strong. The only thing wrong was that the lamb could have braised longer, but the flavor was very good. The potatoes were tender, the carrots perfectly done, and the sprouts very tender and nice. I served our lamb shanks with a Cotes de Rhone wine, as suggested by the cookbook.

I almost forgot about dessert! I prepared it during one of Anya's naps. It was really pretty simple - an egg custard. Yolks & sugar cooked together, then folded into beaten egg whites with fresh, homemade praline (carmelized almonds), rum & vanilla. This was poured into dessert dishes lined with dried ladyfingers which were drizzled with rum and espresso. It wasn't quite as amazing as I'd hoped, but I think that's just because I really prefer rich chocolate desserts. The flavor was very good, and Matt dug into the leftovers only 2 hours after dinner!!

Well, the whole dinner was amazing! I am very pleased with every dish that I prepared. The vegetables had too much butter overall for my tastes, but the flavor was much richer than the veggies I usually make, so I guess it makes a difference. The lamb shanks were a bit underdone, but tasted very rich and flavorful. As far as the trimming goes, I should have removed the fat and silverskin from all of the shanks. There was no need to cut the meat away from the bone, because the meat contracted while cooking anyway - the ones I trimmed look really wimpy with such a small amount of meat on the end!!

Julia Child, you have done it again! An amazing Valentine's Day feast was prepared and enjoyed by one and all. I can't wait to try more recipes!!

Wait... what's this you say? You want photos?? I guess...

Wednesday, 21 May 2008

Creamy 100% Fruit Smoothie

A real, 100% fruit smoothy that is creamy without milk, ice, or ice cream! No processed sweeteners make this 100% delicious and 100% good for you!
~~~~~~~~~~~~~~~~~~~~~~~~


Creamy 100% Fruit Smoothie

1/4 C. frozen (thawed) fruit juice concentrate (any type)
3/4 C. water
1 banana
Others as you Like:
frozen strawberries, blueberries, peaches, raspberries, blackberries, canned or fresh pineapple

  1. This is a basic fruit smoothie recipe. From here you can make any flavor you like! The secret to a creamy milk-free smoothie are the bananas. Peel a bunch of bananas, break them in half, and place them in a gallon freezer bag and store in the freezer. They will break apart easily later. This, along with other frozen fruits will act as the thickener in your smoothie. Frozen peaches make a great thickener but they don't add much flavor- so you can use them even when you don't want a peach taste. I find that frozen fruits are cheaper than fresh, and they keep SOOO much longer!
  2. The basic recipe is as follows: Place 1/4C. fruit juice concentrate and 3/4C. water in your blender. With the blender running, add 1 whole banana (2 frozen pieces).
  3. Now it's up to you! Below are some suggestions.

  1. Strawberry banana smoothie: Use orange or apple juice concentrate, 1 banana, and add about 6-7 frozen strawberries to the basic shake. Also, i really enjoy using white grape/peach juice concentrate on this one!
  2. Tropical Smoothie: Begin with orange juice concentrate, but instead of water, add an 8 oz. can of pineapple tidbits (in juice) and 2T coconut, along with your banana. If the shake is not thick enough, add another banana half or some frozen peaches.
  3. Berry Blast Shake: Begin with apple juice concentrate and water, add 1 banana and 1/4C. each of blueberries, raspberries, blackberries, strawberries - or your favorite combination!
  4. Peanut Butter Banana Smoothie: This one is not quite so good FOR you, but Oh So Good! Start with 1 C. milk, or for dairy-free use 1C. water. Add 3-4 banana pieces, 2-4T. peanut butter, and more banana or peaches to thicken. For a real treat, add 1T chocolate chips or chocolate syrup!

French Vanilla Ice Cream

I know that this is not an original recipe, but I'm sure can't remember where it came from. Oh well...
~~~~~~~~~~~~~~~~~~~~~~~~~~~~


French Vanilla Ice Cream

3 eggs
1 C. white sugar
2 C. milk (any type except skim)
2 C. light cream (half 'n' half)
1 T. vanilla

  1. Beat the eggs and milk in a medium saucepan, then add sugar.
  2. Cook over low-med heat, stirring constantly with a wire whisk, until mixture thickens - about 10 minutes. Remove from heat as soon as it's thick. Constant stirring will keep the egg from curdling. If your egg does curdle, strain through a fine mesh seive after cooking is complete, and you'll be fine.
  3. Cool, then add cream and vanilla. I use homemade vanilla, which is slightly weaker than the store bought variety - start with 2 t. and adjust to taste. Since the eggs are cooked, go ahead and have a spoonful... it's warm custard right now!
  4. Freeze according to the directions that come with your ice cream machine.

Out of This World Chocolate Syrup

I found this recipe floating out on the internet, because they don't have Hershey's Chocolate Syrup here in the UK. Chocolate milk is a favorite for both Matt and I, and Hershey's Syrup was a staple at home. Now, Matt tells me that I'm not allowed to buy Hershey's, even when we get back to the states because this is so much better. Once you taste this, Hershey's won't taste like Chocolate anymore. Seriously... try them side by side on your finger... And, of course, no corn syrup or chemical preservatives. I use this syrup to make wonderful chocolate milk, and just mix it up stronger and heat it in the microwave or over the stove for hot chocolate. And don't even get me started about when I poured it over homemade French Vanilla Ice Cream and fresh strawberries...
~~~~~~~~~~~~~~~~~~~~~~~~


Out Of This World Chocolate Syrup

1/2 cup cocoa (any brand)
1 cup sugar
1 cup water
1 teaspoon vanilla extract
1 dash salt

  1. Whisk together cocoa, sugar, and salt in a medium heavy saucepan(make sure it's larger than you think you'll need). Add water and mix until smooth.
  2. Bring this mixture to a boil. Allow it to boil for 2 minutes after it comes to a rolling boil (use a timer - don't guess). Be careful this does not boil over.
  3. Remove from heat, and when cooled add vanilla. Will appear really runny but will thicken up as it cools.
  4. Stores (from what I can tell) rather indefinitely - covered in the fridge. If you have a large, empty Hershey's bottle, you can double the recipe and put it in there!

Simple Homemade Hot Chocolate

Have you seen the movie Chocolat? It was Vianne's hot chocolate that inspired this thick creamy drink. "Instant" hot chocolate won't even taste like chocolate anymore! And it's so simple!!

Update: Since discovering this tasty treat, I've found an easier, tastier way! And the new way can make chocolate milk too... visit that posting over here.
~~~~~~~~~~~~~~~~~~~~


Simple Homemade Hot Chocolate

4 heaping T. cocoa powder
8 heaping T. white sugar
16 oz. milk, divided

  1. Mix cocoa and sugar together in a med. saucepan. Add 1/2 the milk, and whisk thoroughly until all the powder is absorbed, then add remaining milk.
  2. Heat over med/low heat, whisking about every 1 min, scraping the bottom and corners well, until tiny bubbles just break the surface.
  3. Serve in heavy mugs with mini-marshmallows or whipped cream.